If your hydraulic lift, dump trailer, or mobile equipment is powered by a 12 VDC hydraulic power unit, proper wiring is critical. A clean wiring setup helps your system run smoothly, prevents voltage drop, and reduces the chance of motor failure, relay issues, or unsafe operation.
In this guide, we’ll explain the basics in plain language so end users can understand how to wire a 12 VDC hydraulic power unit with confidence.
Important: Always follow your unit’s wiring diagram first. Manufacturer instructions override general advice.
What You Need Before Wiring
Before you start, prepare the following:
- 12 V battery (fully charged)
- Correct gauge battery cables (positive and negative)
- Fuse or circuit breaker (rated for your unit)
- Solenoid/contactor (if not integrated)
- Ring terminals and heat-shrink tubing
- Crimping tool and wrench set
- Multimeter
- Protective loom and cable ties
- Clean chassis ground point (if chassis grounding is used)
Step-by-Step Wiring & Installation Process
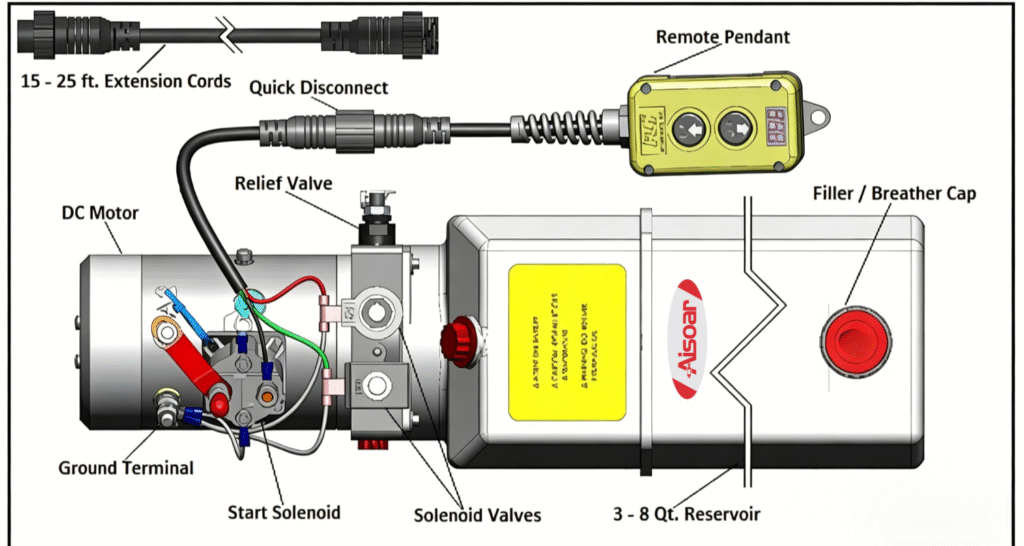
1) Disconnect and Prepare the Remote Pendant
Remove the two-button pendant from the power unit at the quick disconnect before installation work begins.
This prevents accidental activation during setup.
2) Install Hydraulic Fittings at Ports A and B
Install 9/16-18 SAE ORB, SAE #6 fittings into ports A and B.
Torque fittings to 18 ft-lbs.
Correct fitting torque is important: under-tightening may leak, over-tightening may damage threads or seals.
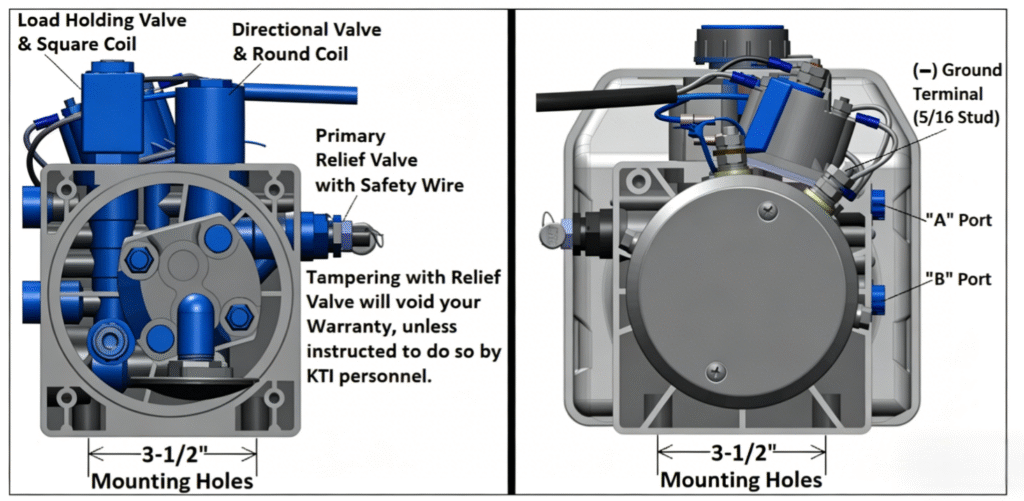
3) Mount the Hydraulic Power Unit
Mount the power unit with two 3/8-16 x 3/4 mounting bolts.
Ensure the unit is rigidly secured and positioned for safe hose and cable routing.
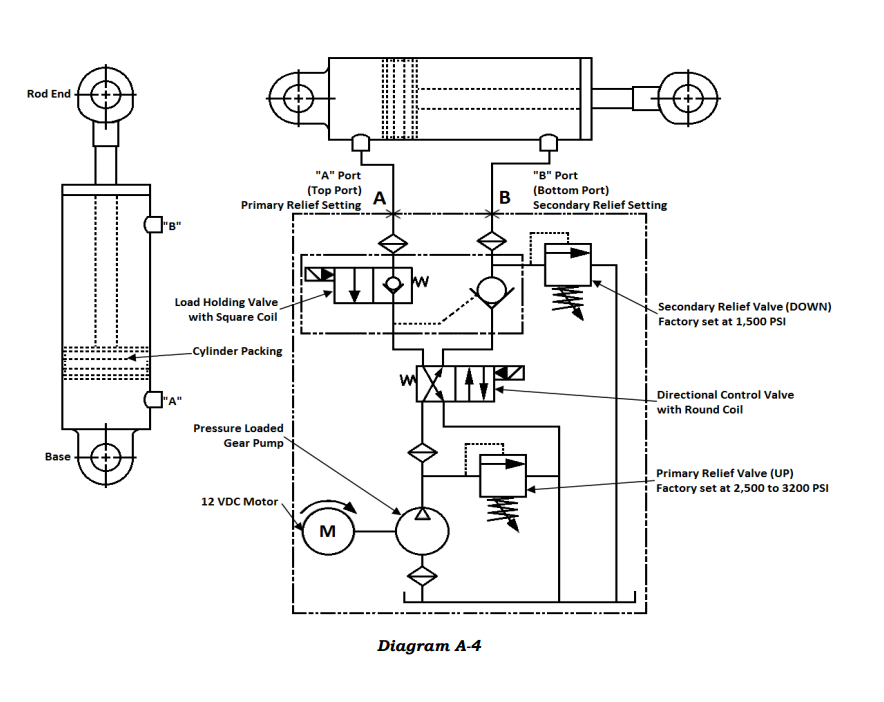
4) Connect Hydraulic Lines Correctly
Connect hoses as follows:
- Port A (TOP) → connect to the base end of cylinder
- Port B (BOTTOM) → connect to the rod end of cylinder
Incorrect hose routing can reverse cylinder behavior or create unstable operation, so double-check before moving on.
5) Fill Reservoir with Hydraulic Fluid
Remove the filler/breather cap and fill reservoir to about 1 inch from top (or to manufacturer “full” reference).
Use only recommended hydraulic fluid type.
6) Make Electrical Ground Connection
Connect the battery ground cable to the ground terminal on the DC motor.
A strong ground path is critical for stable motor performance and reliable current flow.
7) Connect Battery Positive to Start Solenoid
Connect the battery positive cable to the start solenoid terminal.
Use the manufacturer’s battery cable length/gauge recommendation for your model to reduce voltage drop.
8) Properly Torque Battery Terminal Hardware
When securing battery connections, use one wrench to hold the bottom nut in place and torque the upper nut to 3 ft-lbs.
This protects terminal integrity and avoids loose high-current joints that can overheat.
Reconnect the two-button remote pendant at the quick disconnect after all hydraulic and electrical connections are completed.
10) Initial Operation and Fluid Level Monitoring
Run the power unit while closely monitoring reservoir fluid level.
During first startup:
- Do not let fluid drop below 1/2 full
- When cylinder is fully extended, reservoir should be about 1/2 full
Why this matters
If fluid drops too low during initial raise/extend, the pump can pull air into the system.
Then during “down” operation, entrained air can cause fluid aeration (foaming), which may lead to reservoir overflow and unstable performance.
If air enters the system, follow the manufacturer’s bleed cycle procedure to purge air.
11) Final Refill and Cap Installation
After cycling and checks, refill as needed to the marked Full Line (typically about 1 inch from top), then reinstall the filler/breather cap securely.
FAQ Wire Hydraulic Power Units
Q1: Why is there no response when I press “UP”?
A: Check battery voltage first, then verify there is 12V at the control wire. Also inspect the fuse or circuit breaker.
Q2: Why do I only hear a clicking sound, but the motor does not run?
A: This usually indicates low battery voltage, excessive voltage drop in the main power cables, or a faulty solenoid/contactor.
Q3: Why does the motor run, but the cylinder does not move?
A: Possible causes include low hydraulic fluid level, air being drawn into the pump, a stuck valve, or incorrect hose routing (A/B ports reversed).
Q4: Why is the system moving slowly?
A: Slow operation is commonly caused by low voltage, undersized battery cables, cold hydraulic oil, or an overloaded system.
Q5: Why does the cylinder lower abnormally or move in a jerky way?
A: The hydraulic fluid may contain air (aeration). Follow the manufacturer’s bleed procedure to remove trapped air.